
Setting Sender Information
You can set the sender information such as user information and date/time.
- About Sender Information
- Setting Date and Time
- Setting Daylight Saving Time (Summer Time)
- Registering User Information
About Sender Information
If the unit name and unit fax/telephone number are registered, they are printed with date and time as sender information on the recipient's fax.
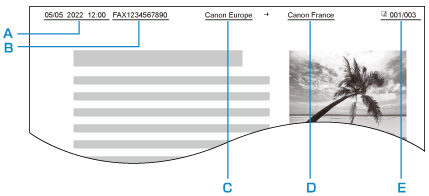
- A: Date and time of transmission
- B: Unit fax/telephone number
- C: Unit name
- D: The registered recipient's name is printed when sending faxes.
- E: Page number
![]() Note
Note
-
You can print USER'S DATA LIST to confirm the sender information you have registered.
-
When sending faxes in black & white, you can select whether to print the sender information inside or outside the image area.
Specify the setting on TTI position in Advanced fax settings under Fax settings.
-
You can select the date print format from three formats: YYYY/MM/DD, MM/DD/YYYY, and DD/MM/YYYY.
Select the date print format on Date display format under Other device settings.
Setting Date and Time
This section describes the procedure to set the date and time.
-
Select Settings on the HOME screen.
-
Select Device settings.
-
Select Other device settings.
-
Select Date/time settings.
-
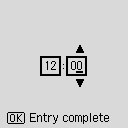
Set the date and time.
Use the

 button to move the cursor under the desired position, then use the
 button to specify the date and time.
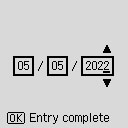
Enter only the last two digits of the year.
Enter the time in 24-hour format.
Setting Daylight Saving Time (Summer Time)
Some countries adopt the daylight saving time (summer time) system that shifts the clock time forward at certain periods of the year.
You can set your printer to automatically change the time by registering the date and time that daylight saving time (summer time) begins and ends.
![]() Important
Important
-
Not all the latest information of all countries or regions is applied for Daylight saving time settings by default. You need to change the default setting according to the latest information of your country or region.
![]() Note
Note
-
This setting may not be available depending on the country or region.
-
Select Settings on the HOME screen.
-
Select Device settings.
-
Select Other device settings.
-
Select Daylight saving time settings.
-
Select ON.
To disable summer time, select OFF.
-
Select Next.
-
Set the date and time when summer time starts.
-
Select the month when summer time starts.
-
Select the week when summer time starts.
-
Select the day of the week when summer time starts.
-
Use the
button to move the cursor under the desired position, use the button to specify the time (in 24-hour format) when summer time starts, then press the OK button.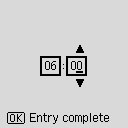
-
-
Select Next.
-
Set the date and time when summer time ends.
-
Select the month when summer time ends.
-
Select the day of the week when summer time ends.
-
Select the week when summer time ends.
-
Use the
button to move the cursor under the desired position, use the button to specify the time (in 24-hour format) when summer time ends, then press the OK button.
-
Registering User Information
This section describes the procedure to register the user information.
![]() Note
Note
-
Before sending a fax, be sure to enter your name and fax/telephone number in Add unit tel. number and Add unit name on the Fax user settings screen (for US only).
-
Select Settings on the HOME screen.
-
Select Device settings.
-
Select Fax settings.
-
Select Fax user settings.
-
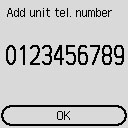
Enter the unit fax/telephone number.
-
Select Add unit tel. number.
-
Use the Numeric buttons to enter the unit fax/telephone number.
 Note
Note-
You can enter the fax/telephone number up to 20 digits, including spaces.
-
-
-
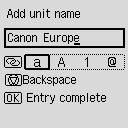
Enter the unit name.
-
Select Add unit name.
-
Use the Numeric buttons to enter the unit name.
 Note
Note-
You can enter the name up to 24 characters, including spaces.
-
-
